![Untitled design (55).png]](https://help.yourhere.ca/hs-fs/hubfs/Untitled%20design%20(55).png?height=50&name=Untitled%20design%20(55).png)
I want to...
- Add a New Screensaver or other type of Playlist
- Add a New Screensaver or Playlist Slide
- Add an Overlay to a Slide
- Create a Custom Overlay to add to a Slide
- Assign a Playlist to a Unit
- Work with Multiple Playlists
Adding a new Screensaver or other Playlist:
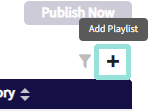
On the side Nav, click Playlists.

Click the plus icon on the top right to add a new playlist.
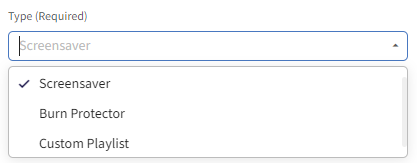
Fill out the fields and click Add to save your changes. You will only be able to select a resolution from the drop down options if a unit matching that resolution exists in your account. If you instead need to create a playlist with a custom resolution (banners, ad space, etc), you're able to enter a custom size by toggling "Custom Resolution".

Keep in mind that each unit can only have one screensaver and burn protector type playlist running, but can run multiple custom playlists if desired.
Under Assigned Units, we can assign this screensaver playlist to a unit. Units that have mismatching resolutions or that already have a screensaver will not be selectable.

Once the playlist is created, we can add our slides.
You can click Publish Now to commit your changes. Please allow up to 60 minutes for changes to be synchronized to your on-site information hubs.
Adding a New Slide
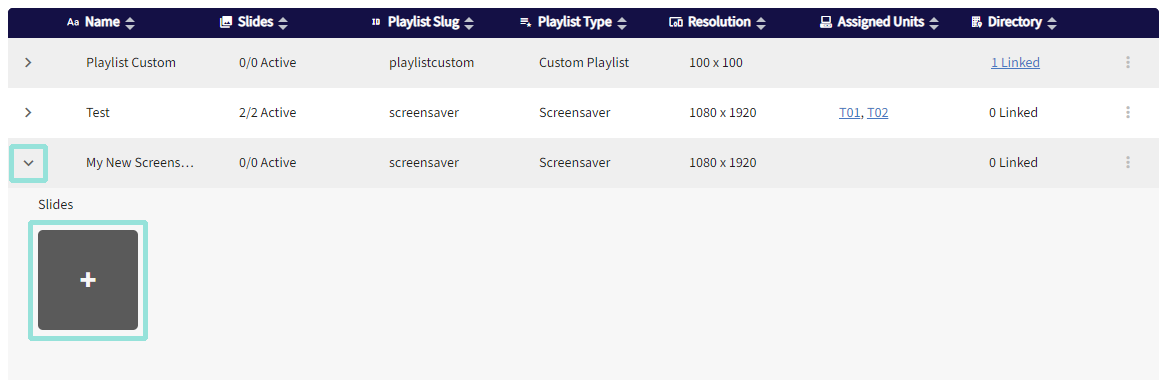
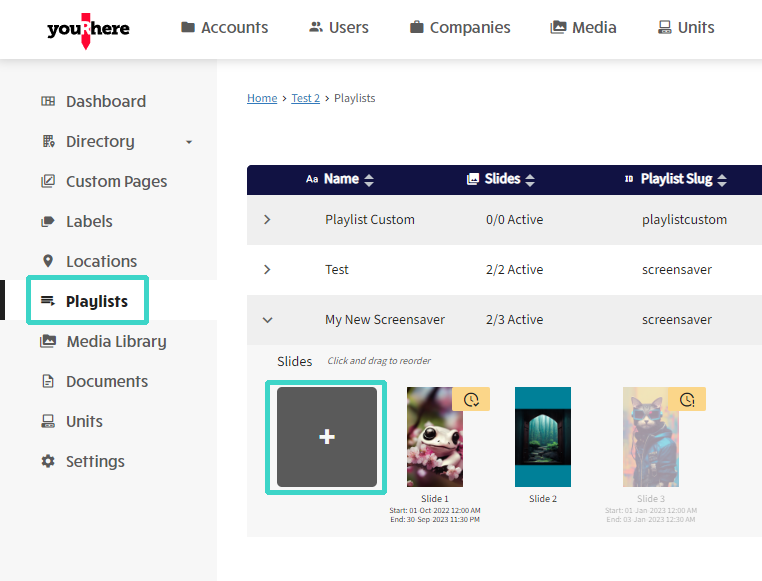
On the side Nav, click Playlists.
Click on the carat to expand the slide view and click the large plus icon to add.
In the dialog that pops up, fill out the details for your new slide, including any schedule you want to add. Click on the large folder on the left to select or upload media. The preview box on the left automatically resizes to fit the dimensions you specified for the screensaver.
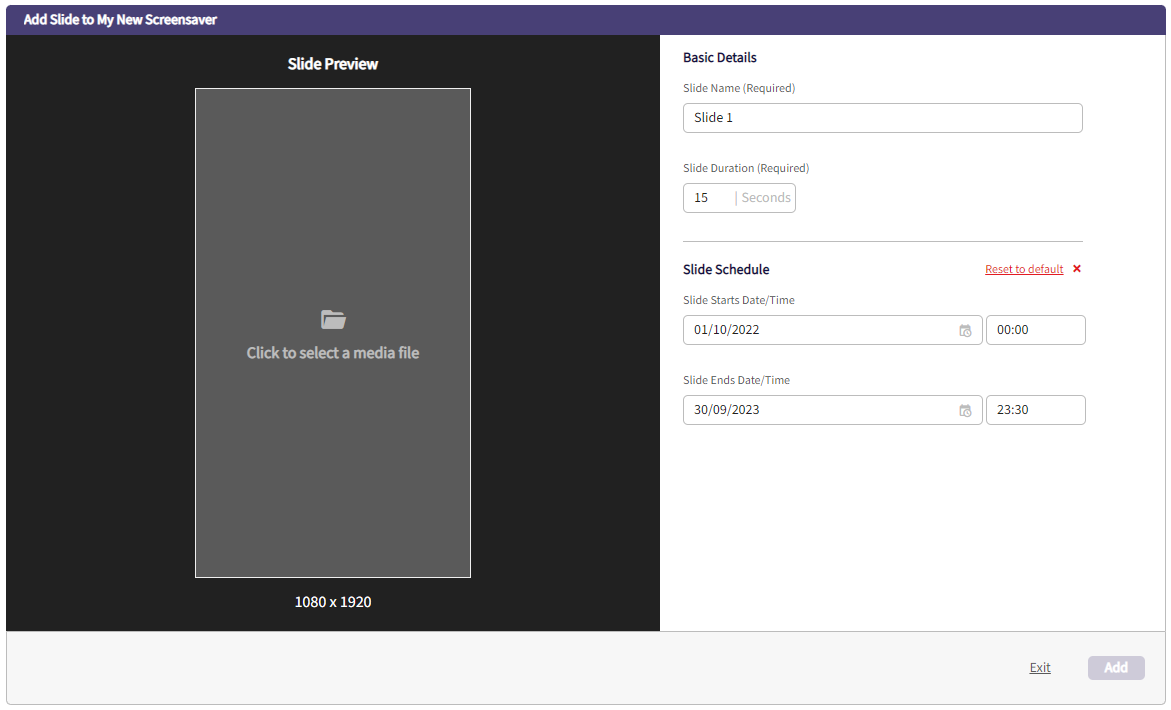
Once you've selected or uploaded your media, you'll be able to access additional settings for the image, including fit and background options for media that isn't already optimally sized, or to add and position an overlay if necessary.
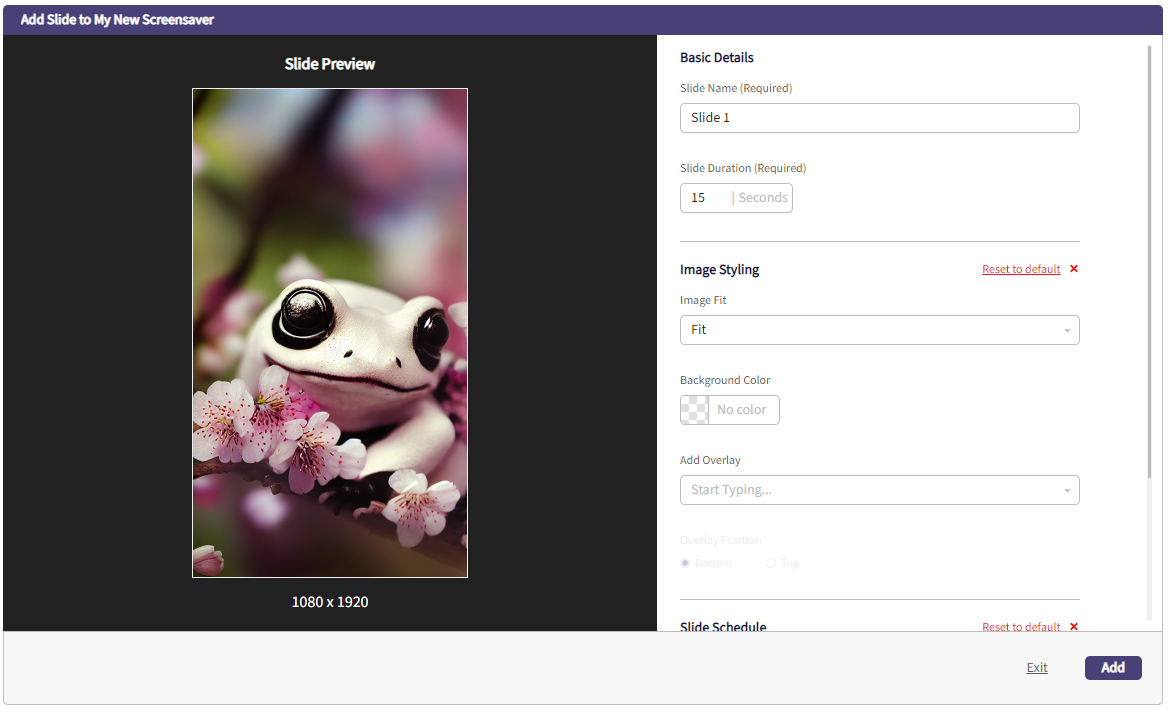
Click Add to save your changes.
Here I've added a few extra slides with different fit options and schedules. Notice the icon changing depending on whether a slide is scheduled and active, or scheduled and inactive.

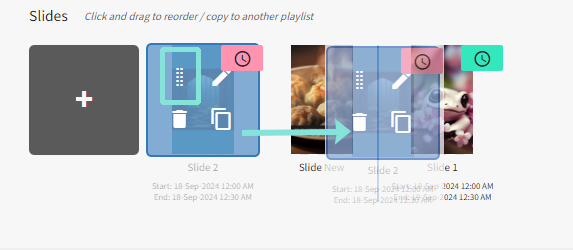
You're also able to click and drag the slides to reorder the order in which they appear, if desired.
You can click Publish Now to commit your changes. Please allow up to 60 minutes for changes to be synchronized to your on-site information hubs.
Working with Overlays:
In order to communicate how to access the home screen to our users, we can add an overlay to our slides on the CMS using a built-in feature. You can upload your own to use with your branding, or use the default one provided.
Using the Default Overlay:
We'll work with the same playlist as before and add a new slide with an overlay. First, we'll navigate to Playlists, then click to add a new slide.
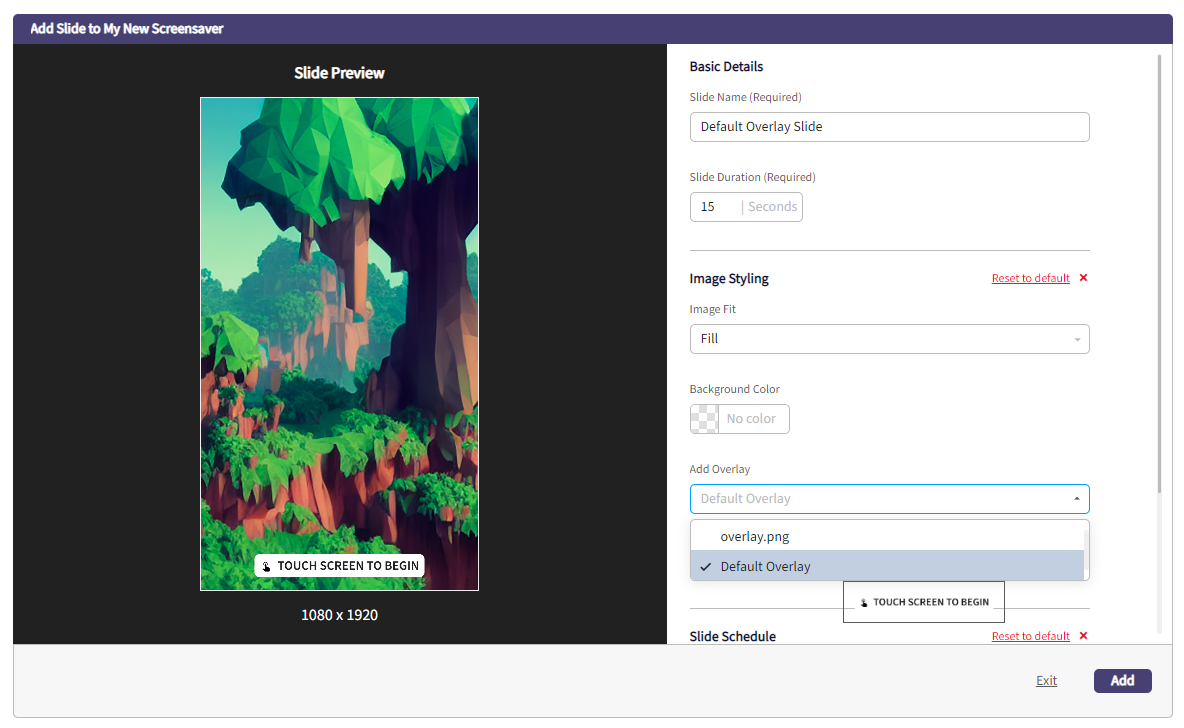
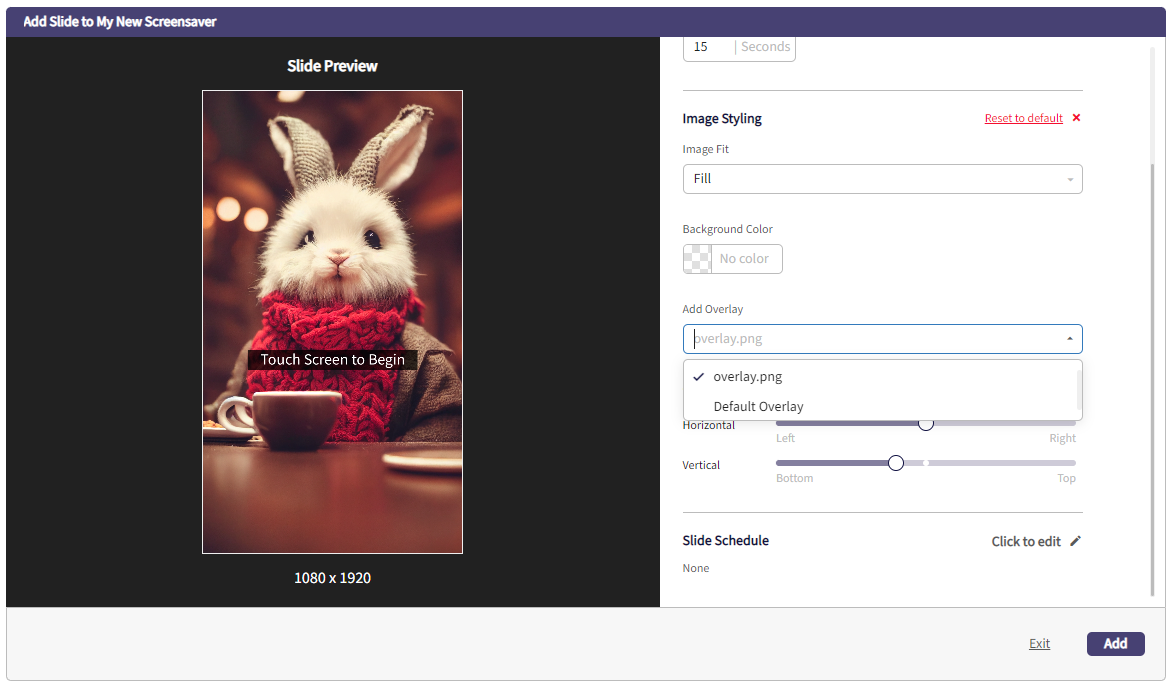
In the dialog that pops up, fill out the details for your new slide, including any schedule you want to add. Click on the large folder on the left to select or upload media. The preview box on the left automatically resizes to fit the dimensions you specified for the screensaver.

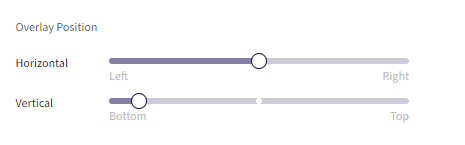
We can now choose to add the default overlay highlighted below to the image to create our slide. This feature is accessed under Image Styling. You can also click and drag the sliders under Overlay Position to manually adjust the position of the overlay. Click Add when you're finished.
Our new slide with default overlay now exists in the rotation. You can repeat this process for as many slides as you like.
You can click Publish Now to commit your changes. Please allow up to 60 minutes for changes to be synchronized to your on-site information hubs.
Adding a Custom Overlay:
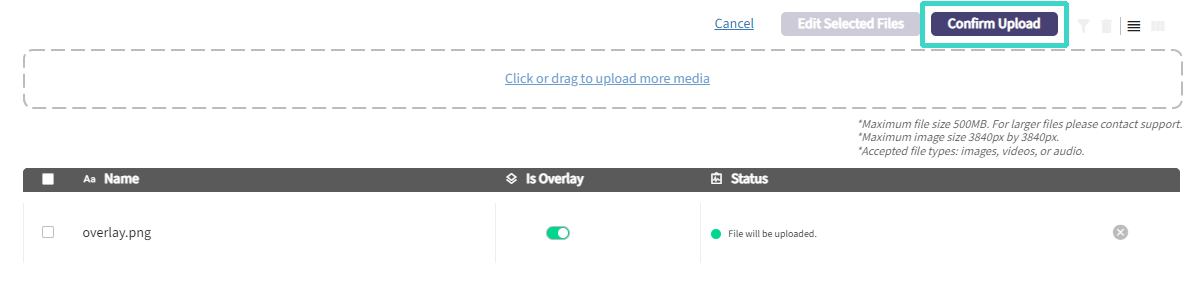
On the side Nav, click Media Library, then click Overlays

Drag the media you want to add into the dashed upload area or click to search for files from your computer. Click Confirm Upload once you've selected the files you'd like to use. Overlays should be saved in a file type that supports transparency in order to work as intended (PNG suggested).

Now we can use this overlay in a playlist. We'll work with the same playlist as before and add a new slide with an overlay. First, we'll navigate to Playlists, then click to add a new slide.
In the dialog that pops up, fill out the details for your new slide, including any schedule you want to add. Click on the large folder on the left to select or upload media. The preview box on the left automatically resizes to fit the dimensions you specified for the screensaver.
We can now choose to add our overlay to the image to create our slide. This feature is accessed under Image Styling. Click Add when you're finished.
Our new slide with custom overlay now exists in the rotation. You can repeat this process for as many slides as you like.
You can click Publish Now to commit your changes. Please allow up to 60 minutes for changes to be synchronized to your on-site information hubs.
Assigning a Playlist to a Unit
On the side Nav, click Playlists, then click the kebab of the Playlist you want to assign. As you can see, the one I've clicked currently has no units assigned.

In the drop-down menu that appears, select to Edit Playlist.

In the dialog box that opens, we will be able to assign this playlist to a unit as long as the resolution matches. In this case, our resolution matches T01 and T02. However, T02 already has a screensaver playlist assigned, so we will be assigning this playlist to T01 only.

Once the units you want to assign this playlist to are selected, click to Save your changes.

We can now see that our playlist assignment has been saved.

You can click Publish Now to commit your changes. Please allow up to 60 minutes for changes to be synchronized to your on-site information hubs.
Working with Multiple Playlists
You might need to have multiple playlists running similar slides, with the same settings. To duplicate a playlist using the settings and slides you've already specified rather than starting fresh with a brand new playlist, click the kebab on the right of the playlist you want to duplicate, then click Duplicate Playlist. Click Duplicate to confirm.


Now you have two identical playlists, and you can make any necessary changes to the copy while keeping the settings and slides you'd already set up.

If you have multiple playlists, you can also drag a slide from one to another, which will add a copy of that slide to the playlist.


Once satisfied with your changes, you can click Publish Now to commit them. Please allow up to 60 minutes for changes to be synchronized to your on-site information hubs.